The tank wars have been waging for a while now. It seems like the emerging superpowers on that front are Kanger and Aspire. This is a review of Kanger’s latest bit of heavy artillery, the Subtank. The Subtank is an interesting offering that can act as a traditional tank or an RBA. Read on for the review to find out if this is versatility or a complete come-on.
Disclosure: this product was provided by Kanger Mall for review purposes.
Available from Kanger-Mall.com
Kanger Subtank Design Review
 Big. The first impression I got when opening the (sideways opening) box was just how incredibly enormous this tank was. It’s so big that it includes an adapter that works sort of like one of those eGo adapters, except it tapers the base of the tank down to the size of a large regular tank.
From a capacity standpoint, it houses over 6ml when used with the single coil heads, and 4 and change when used in RBA mode.
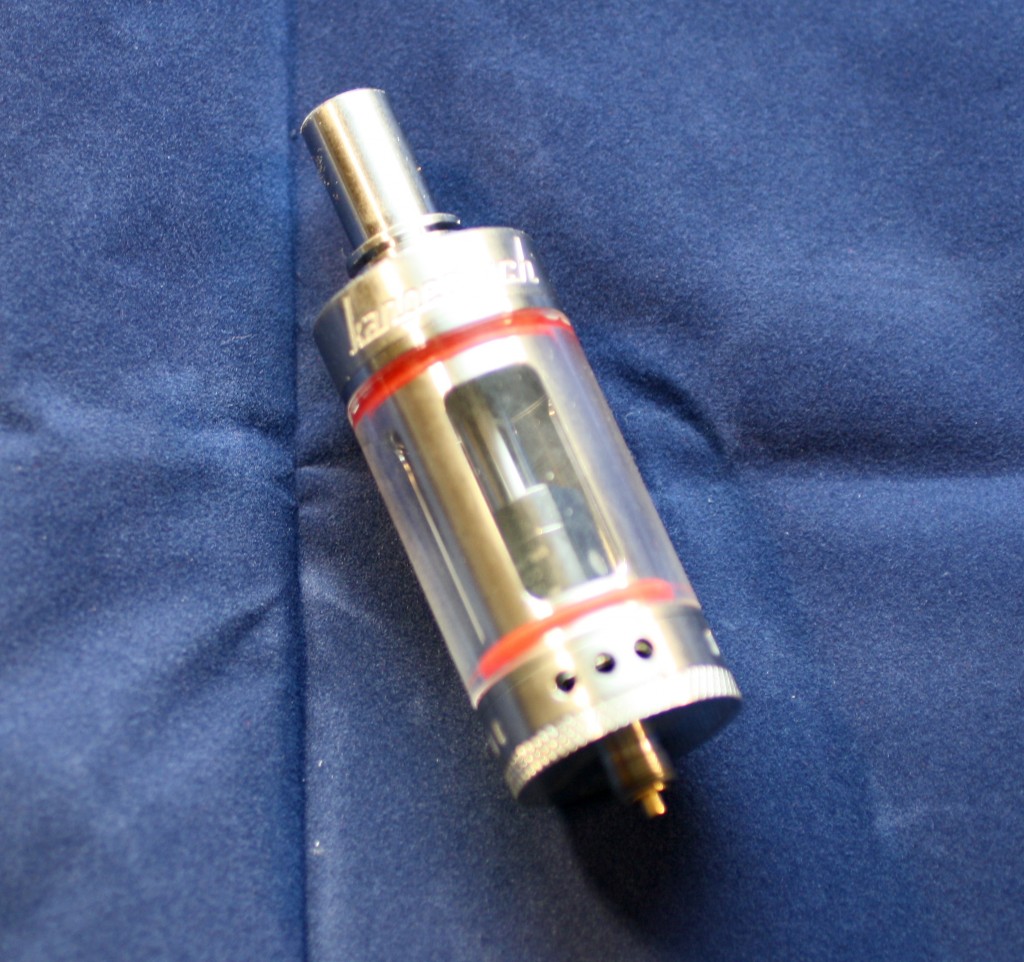
I think I might be getting a little ahead of myself here, so let’s jump back to the exterior view of the Subtank. The tank is a sight to behold decked out in glass, stainless steel and red stripes. The red stripes being the gaskets that keep the liquid right where it belongs.
Rather than the tank being solid glass, it appears to be shiny metal with a series of rounded rectangle viewing holes. The interesting part is that unlike most tanks with this sort of setup, the steel part of the tank sits inside the glass, rather than fitting over the glass.
The top cap lacks any sort of odd lines or fluting, save for the Kangertech logo. The logo is written in a script font which evokes logos found on cars in the 1950’s.

There is one odd thing about the top cap. On either side of the drip tip (which does include the aforementioned fluting and grooves), you’ll find two screws. These screws are used to swap out the top cap and stem assembly to convert the tank to and from the RBA mode.
So why the need for screws instead of just screwing in a new top cap? Remember that cage I mentioned a few paragraphs ago? The top cap screws into the cage, which makes for a pretty rigid internal superstructure.
Before visiting the inside of this tank further, let’s hop down to the bottom portion of the tank. This portion consists of basically two parts. The first, upper section is the airflow control. It features three large holes and can be rotated to expose or cover holes behind the band to increase or decrease airflow accordingly.
There’s also some indentations along this part to make it easier to grip and turn when adjusting. Pretty common stuff by modern standards.
 More interesting is the battery connector. It adjusts automatically via a spring-loaded positive pin protruding from the center of the battery connector. That’s also been done. What makes it interesting is how far the pin protrudes and how much travel it has. It even has no problem adjusting to my rather temperamental Cana DNA mod.
Kanger Subtank Head System
Alright, let’s skip ahead to what has to be the most interesting aspect of the Kanger Subtank: the atomizer heads and RBA adapter.
There’s a lot to be said about the heads. First of all, regular Kanger heads from things like the ProTank aren’t going to work at all in the Subtank. These heads are square and also lack the stem traditionally found in a Kanger-style head. Rather, the internal stem of the tank fits inside an opening at the top of the head.
You’ll find two heads in the box with this tank. The first is a fairly conservative 1.2 ohm. The second head is rated at 0.5 ohm. And now we know where the tank gets its name, because it has sub ohm capability.
But wait, there’s more! Most standard vaping tanks use silicone wicks for their heads. RBA fans tend to use things like cotton for wicks. And the latest rage in cotton wicks is Japanese cotton. So, that’s what Kanger is using for wicks in the Subtank heads.
Because, of course they are.
 It almost makes me wonder why they bothered with the RBA insert. After all, isn’t the idea to get RBA performance out of a traditional Pyrex tank?
Nonetheless, you get an RBA adapter too. Basically what this consists of is the previously mentioned top cap, which features a shorter stem to offset the displacement of the RBA housing. Then there’s the RBA housing which is similar in design to many popular RBAs.
The unit naturally screws into the base of the tank and features a deck section with two mounting screws for coils. A base covers the deck and screws into the top chimney section that fits over the stem from the top cap.
Kanger was even nice enough to pre-mount two coils in the atomizer. The coils meter in at .5 ohm. There’s no wicks, but included in the box is some Japanese cotton to build your own. You also get a couple extra coils thrown in for good measure.
Using the Kanger Subtank
One thing I like about the RBA configuration is filling the Subtank. Unlike most other RBAs, you don’t need to undo a tiny little screw, try not to loose it and then fill the tank from a tiny pinhole without getting e-liquid everywhere.
 You fill this tank in either mode like most other tanks. Unscrew the bottom cap and then pour the e-liquid in. Because this tank is so huge, there’s a big enough space between the center post and side of the tank that you can drive a truck of e-liquid in there without worrying about getting any down the stem.
The only real complaint I have about filling is that there’s a gasket that tends to come loose when you remove the bottom cap for filling. The easiest way to replace it is to just set it on top of the glass and then carefully screw the base back on. The gasket will then pop into its proper place.
Now for performance. To be honest I find the whole experience just a little surreal. First of all, the included user manual suggests the .5 ohm head’s wattage range tops out around 25 watts. You have to be a little more careful with the higher resistance head, that one’s only good to about 20 watts.
20 freakin watts in a vaping tank. That’s pretty much double what most other tanks can do.
And they aren’t kidding. I had no problem running at the top wattage settings and beyond. I ran the .5 ohm head at the maximum 30 watts of my DNA mod for a while without much issue. The flavor did start to go weird after prolonged use, so I dialed it back to 22 watts or so.
The story is the same with the other head, 20 watts was more of a cruising speed than a maximum limit.
Again, that means the vapor didn’t all go to crap on me. Flavor is outstanding on these tanks. And the vapor? Oh yeah, there’s vapor to spare.
 It’s the same story running in RBA mode as well. Naturally, there’s going to be some variation in this department since a lot depends on the coil build in an RBA setup. I kept the stock coil configuration and just made a couple of simple short wicks to go in them.
I found the performance was on par with most other RBAs I’ve run across. It’s very much like a Kayfun Lite, which makes sense since the atomizer design is very similar.
The RBA-equipped Kanger was at home at 30 watts on the APV as well as produced great results using my Arachnid mech mod.
 Basically, it acted exactly as you would expect a decent RBA to behave.
Sure, I think the size is a little bit of a drawback since it isn’t that pocketable. But, I’m not sure you can pull off the same trick with a smaller tank. For one, producing that much vapor means you’re going through a lot of e-liquid. You’d be constantly refilling a smaller tank.
As it is now, the 6ml capacity in tank mode is more then enough for the average person to go a day or more without refilling.
I rarely rave so hard about a product, but I have to admit I’m quite impressed by this tank. I think it might be the combination of simplicity and performance usually reserved for much more complex rebuildable setups. I’m the type that likes to just fill it up and go, and the Subtank excels in that regard.
I think others agree with me too since this tank is often out of stock at many shops. As of this writing, Kanger Mall has them available for sale. Click here to visit Kanger-Mall.com


